PROJECT NIGHTLIGHT
 |
| Finished Nightlight! |
Welcome Back! I, your humble guide, am going to take you into the world of Black Ops (operations:). OK . . . OK! This is yet another fun, and creative idea using Mokume Gane tutorial adapted for polymer clay in creating your own one-of-a-kind (OOAK) nightlight covers.
So . . . . Let's get started!
First, it is assumed that you are knowledgeable in working with polymer clay; all aspects in it's basic uses, and precautions. I have used Angela Ballew's: Sparkle, Sparkle technique for this project. If you are not familiar with it here is the link to create your stack and slices -
Sparkle, Sparkle by Angela Ballew
Materials you will need for this project are as follows: acrylic roller, a shot glass, 16 gauge wire (aluminum floral wire works well) wire cutters, needle nose pliers, liquid translucent polymer clay medium, nightlight ( got mine from the dollar tree), tissue blade, exacto knife (optional). I already have slices from her tutorial and I chose this one to work with because, you want quite a bit of translucent clay on the bottom of it to shine through your nightlight cover.
Then you want to back this slice with a sheet of translucent to stabilize the slice so, that your cover won't break through this process. The final sheet should be approximately an 1/8" inch or, the thickest setting on a pasta machine but, do not run this sheet through the past machine.
Now, take your shot glass, the reason I have chose this is because, it is the perfect size to make a screen that will fit in front of the nightlight itself. Forgive mine being covered in foil, reason being . . .I cracked it! But, I have eliminated that bug! Square up you sheet a bit. It will need to be about 3.5x3.5" Inches. Lay your sheet over top of the shot glass and trim the top and bottom to the shot glass ( 3" inches ) and angle your sides slightly, again, 3" inches across. yours should look like mine below:
 |
| squared up sheet |
 |
| 3"x3" inches - measurement of shot glass |
 |
fitted on shot glass - dusted with baking soda to smooth any imperfections and readied for baking
|
Here is my set up for baking: I bake in an aluminum pan with a layer of baking soda that can be reused. I place a sheet of foil under that pan and then over the pan, to avoid scorching the translucent. Bake your piece on top of your shot glass at manufacturers directions for your translucent clay you have used. I bake at 275F degrees for approx. 15-20 mins. Watch yours.
I check my piece to see if it is firm and then, I turned off my oven and took my tissue blade and lightly lifted the polymer clay piece off the shot glass and plunged it into ice water to stop the action of continually baking the clay. You can, just turn off the oven and let it totally cool down until, you can handle the piece. But, this way I did not break my shot glass! And, was able to get the most from the translucent polymer clay.
 |
| polymer clay screen only in bowl of ice water |
 |
| my screen at this point |
Project Nightlight - working with the nightlight
At this point, I lightly sanded with 1000 grit wet/dry sandpaper to smooth out the edges, and top of the screen . . . don't want to break it! Use a light touch when doing this step.
Okay, set your screen you created aside, and let's get our nightlight, 16 gauge wire, needle nose pliers, wire cutters and translucent liquid polymer clay.
Next take your nightlight from it package and remove the screen (this usually slides off) and remove the bulb from it's socket, as shown below.
 |
nightlight taken apart and bulb removed
Take your 16 gauge wire and with you wire cutters, cut off about 6-8" inches of wire
|
 |
I have chose pink 16 gauge aluminum floral wire
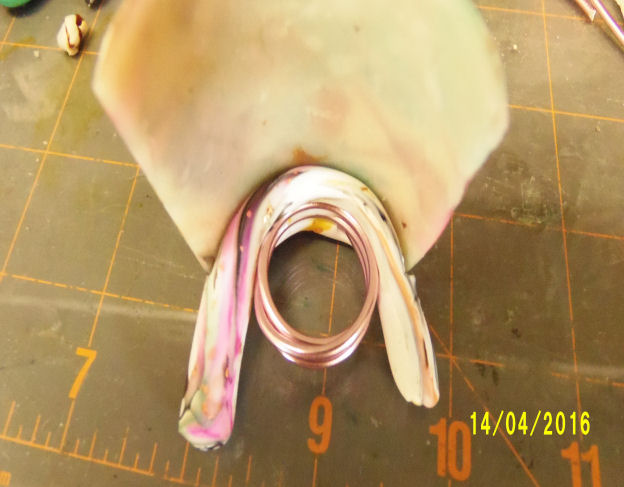
From the center of the wire wrap in both directions about 3 wraps then, with your wire cutters take off the excess wire flush with the circle you have created around the socket. Wrap closely together and check to make sure you can easily slide this ring on, and off the bulb socket, as shown below. Then, once you have determined it correctly, remove it from the bulb socket completely, as we will next work with this ring.
|
 |
| wire wrapped bulb socket, ends have not been removed yet |
Working With Your Designed Nightlight Screen
Set your nightlight aside and with you screen with its back facing you, take some scrap clay from your sheet and roll it into a 1/2 thick log. Doesn't have to be very long as it is going to be fitted to the back of your screen. Trim any excess clay with an exacto knife or you can use your tissue blade.
When you have it trimmed and fitted the way you want, carefully remove the ring with the polymer clay attached to it and apply your translucent liquid polymer clay medium to the space when the ring will set. I left a 1/4" inch edge at the bottom of my screen so the screen itself will set just below the bulb socket nicely. When you are satisfied with the fit and wiped any excess around the ring with a paper towel or wet wipe place it back into your pan, cover and bake at manufacturers suggestion . . . I baked at 250F degrees for 35-40 minutes and checked to make sure the liquid went transparent, turned the oven off and let the piece totally cool down.
Here is the finished piece and placed back upon the bulb socket comfortably. You're done!!!
Turn it around and adjust the screens fit, and there you have it! TA DA!!!
***I have also tested putting a coat of Polycrylic and Varathane on the front only of these screens and it works! No overheating, melting, cracking of the finish, and cool to the touch when the light is turned on. These nightlights have been on now for 6-8 hours. So, just a heads up, you can put a finish on them.
 |
Plug it in to any wall socket and turn it on! And, bask in its beauty knowing you created it! Enjoy!
Thank you so much for coming along with me on this journey, I hope you enjoyed it! Now, go ....do... and create!
|


