Showing posts with label translucent polymer clay. Show all posts

Friday, April 15, 2016

Project Nightlight - A Black Operation

PROJECT NIGHTLIGHT

Finished Nightlight!


Welcome Back!  I, your humble guide, am going to take you into the world of Black Ops (operations:).  OK . . . OK! This is yet another fun, and creative idea using Mokume Gane tutorial adapted for polymer clay in creating your own one-of-a-kind (OOAK) nightlight covers.

So . . . . Let's get started!

First, it is assumed that you are knowledgeable in working with polymer clay; all aspects in it's basic uses, and precautions.  I have used Angela Ballew's: Sparkle, Sparkle technique for this project.  If you are not familiar with it here is the link to create your stack and slices - Sparkle, Sparkle by Angela Ballew


Materials you will need for this project are as follows: acrylic roller, a shot glass, 16 gauge wire (aluminum floral wire works well) wire cutters, needle nose pliers, liquid translucent polymer clay medium, nightlight ( got mine from the dollar tree), tissue blade, exacto knife (optional). I already have slices from her tutorial and I chose this one to work with because, you want quite a bit of translucent clay on the bottom of it to shine through your nightlight cover.


Then you want to back this slice with a sheet of translucent to stabilize the slice so, that your cover won't break through this process.  The final sheet should be approximately an 1/8" inch or, the thickest setting on a pasta machine but, do not run this sheet through the past machine.

Now, take your shot glass, the reason I have chose this is because, it is the perfect size to make a screen that will fit in front of the nightlight itself.  Forgive mine being covered in foil, reason being . . .I cracked it!  But, I have eliminated that bug! Square up you sheet a bit.  It will need to be about 3.5x3.5" Inches.  Lay your sheet over top of the shot glass and trim the top and bottom to the shot glass ( 3" inches ) and angle your sides slightly, again, 3" inches across. yours should look like mine below:

squared up sheet

3"x3" inches - measurement of shot glass

fitted on shot glass - dusted with baking soda to smooth any imperfections and readied for baking


Here is my set up for baking: I bake in an aluminum pan with a layer of baking soda that can be reused. I place a sheet of foil under that pan and then over the pan, to avoid scorching the translucent.  Bake your piece on top of your shot glass at manufacturers directions for your translucent clay you have used.  I bake at 275F degrees for approx. 15-20 mins.  Watch yours.


I check my piece to see if  it is firm and then, I turned off my oven and took my tissue blade and lightly lifted the polymer clay piece off the shot glass and plunged it into ice water to stop the action of continually baking the clay.  You can, just turn off the oven and let it totally cool down until, you can handle the piece.  But, this way I did not break my shot glass! And, was able to get the most from the translucent polymer clay.

polymer clay screen only in bowl of ice water

my screen at this point


Project Nightlight - working with the nightlight

At this point, I lightly sanded with 1000 grit wet/dry sandpaper to smooth out the edges, and top of the screen . . . don't want to break it! Use a light touch when doing this step.

Okay, set your screen you created aside, and let's get our nightlight, 16 gauge wire, needle nose pliers, wire cutters and translucent liquid polymer clay.

Next take your nightlight from it package and remove the screen (this usually slides off) and remove the bulb from it's socket, as shown below.

nightlight taken apart and bulb removed


Take your 16 gauge wire and with you wire cutters, cut off about 6-8" inches of wire

I have chose pink 16 gauge aluminum floral wire


From the center of the wire wrap in both directions about 3 wraps then, with your wire cutters take off the excess wire flush with the circle you have created around the socket.  Wrap closely together and check to make sure you can easily slide this ring on, and off the bulb socket, as shown below.  Then, once you have determined it correctly, remove it from the bulb socket completely, as we will next work with this ring.


wire wrapped bulb socket, ends have not been removed yet


Working With Your Designed Nightlight Screen

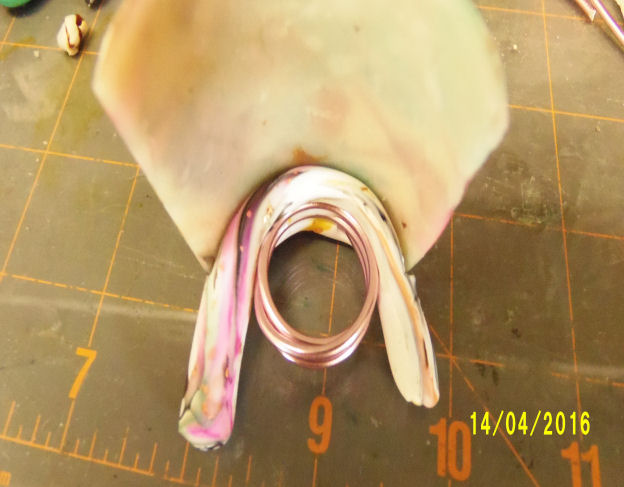
Set your nightlight aside and with you screen with its back facing you, take some scrap clay from your sheet and roll it into a 1/2 thick log.  Doesn't have to be very long as it is going to be fitted to the back of your screen.  Trim any excess clay with an exacto knife or you can use your tissue blade.


When you have it trimmed and fitted the way you want, carefully remove the ring with the polymer clay attached to it and apply your translucent liquid polymer clay medium to the space when the ring will set.  I left a 1/4" inch edge at the bottom of my screen so the screen itself will set just below the bulb socket nicely.  When you are satisfied with the fit and wiped any excess around the ring with a paper towel or wet wipe place it back into your pan, cover and bake at manufacturers suggestion . . . I baked at 250F degrees for 35-40 minutes and checked to make sure the liquid went transparent, turned the oven off and let the piece totally cool down.


Here is the finished piece and placed back upon the bulb socket comfortably.  You're done!!!


Turn it around and adjust the screens fit, and there you have it! TA DA!!!


***I have also tested putting a coat of Polycrylic and Varathane on the front only of these screens and it works! No overheating, melting, cracking of the finish, and cool to the touch when the light is turned on.  These nightlights have been on now for 6-8 hours.  So, just a heads up, you can put a finish on them.

Plug it in to any wall socket and turn it on! And, bask in its beauty knowing you created it! Enjoy!


Thank you so much for coming along with me on this journey, I hope you enjoyed it! Now, go ....do... and create!


Saturday, March 19, 2016

Busy in the Lab!!! with more Mokume Gane

Hello! I am soooo glad, and little giddy that you found me in the lab once again, working with polymer clay using the Mokume Gane techniques!

First off I have been wanting to know how my good friend Mary Beth Hobbs achieved the richness of this bangle cuff bracelet . . . simply stunning! you can see the various shades of lemon, butterscotch and cognac that actually occurs in amber.  Sooooo, I knew she had posted  this process in my Facebook group called, Mokume Gane - Advanced Techniques.  I went wading through a years worth of posts and found it!!!!! I created a page specially for her work of art.  You can find this page here:  From The Bench: Amber Mokume Gane Technique


http://marilynrknopic.blogspot.com/p/the-companion-to.html


Then to top it all off I created a page under the full guidance and permission from Mary Beth a step-by-step photo tutorial so you can create this truly fabulous Mokume Gane stack with me by your side!  You can find this page at:  The Companion - Step-by-Step Picture Tutorial


cuff bangle bracelet by Marilyn Ray Knopic using the Amber Mokume Gane Technique
by Mary Beth Hanson Hobbs


And, if that wasn't enough I want to say, Thank you to all of you, who have allowed me to come into your art studios.  I am deeply humbled in all the wonderful responses to this blog, and the over 13,000 visits to these pages in the past 9 months!!! Thank you.

Be sure to check back as I will be featuring yet, another polymer clay artist! And, another fabulous Mokume Gane technique.


Bye for now!


Sunday, November 1, 2015

The Glow Experiments

As with all my experimenting in the different aspects of the technique, Mokume Gane holds for polymer clay, I was thinking about the layering of the B/W  sheets and the purpose for each in revealing the design placed in the polymer clay ... hence, the experiment with glow clay was born!

* I am using Sculpey Glow polymer clay.


 First, condition your clay, I ran it through the pasta machine (you can do it by hand) on the thickest setting, as you can see it is already glowing!!!


In the picture above, I applied the silver leaf and alcohol inks of choice (teak, butterscotch,golds and a 'Lil raspberry) then, allow to completely dry.  Once dry, I rolled out a thin sheet of translucent polymer clay and laid it on top of the sheet that was inked, then rolled out a sheet of black on the thickest setting and laid that on top of the stack then, ran the entire stack through the pasta machine on the thickest setting.  You may cut your stack in half if it is more manageable and make a double stack or just use your single stacks to cut-in your design.

** side note:  ( the sheet of white has been omitted so the glow clay shows up nicely as, you have the black outlining your design).


Here are the slices that were obtained from my single stacks.  top: lights on - bottom: lights off
 

~~ * ~~


Below are a few completed projects made from the slices obtained from the stack I had created 


~~ * ~~


~~ * ~~


Sunday, June 14, 2015

Recent Mokume Gane Stack


Mokume Gane Technique Adapted for Polymer Clay


Large size Disk Beads


Love the transparency achieved in these disks!
** hand model is Jon Williams :-)                                

The results of my recent experiments with alcohol inks and translucent polymer clay are coming in slowly as I am creating disk beads from the created stack and obtaining sheets using the Mokume Gane technique, adapted for Polymer Clay.
 
How this experiment came about was, I was cleaning my workstation when I came upon a sheet of translucent already inked and silver leaf added to it!!!! Egads, you know that feeling when you find something you had completely forgot you had created, that initial sinking feeling in the pit of your stomach! I quickly grabbed it up and upon examining it, discovered some of the ink had bled through the trans.  So, I quickly created a sheet of B/W both on a thick setting then reduced that on the thickest setting and laid it upon the translucent clay that I found already prepared. Then using my acrylic roller, reduced the stack to not quite half its original thickness. I got thinking how much I would really like to have more silver and blue come through so I placed another sheet I created under the original sheet I found of the inked up translucent polymer clay, and then cut the stack in half! Stack it again with the black on top.  I used the blunt end of my strictly for polymer clay use only cookie cutter shapes, and plunged them the clay itself.  Satisfied with the design, I slightly rolled over it,  lightly to compress the layers, and pushed the sides in slightly to create a more pleasing rectangular shape for slicing full sheets.  Below are the slices I rendered from the stack . . . .
 
 
some nice full sheet slices!


Wednesday, June 10, 2015

A Note Of Thanks!

I want to say, "Thank You" to EVERYONE from around the globe who came to this blog to view, study and hopefully begin working with the tutorial I blogged freely to ALL. 

Please do not hesitate to ask me questions if there is anything you do not understand or can't seem to grasp the information I have presented in the tutorial.  There are a number of ways to bring your inquiry to my attention; you may post directly within the blog site itself, email me on google+ or catch up with me over on Facebook.

I have recently created a closed Facebook group for those wanting to learn more about this technique and/or share your works created after working through the tutorial and want to talk with other like-minded artists, feel free to come join us!  The group is Mokume Gane - Advanced Techniques and is subject to administrative approval upon your request.

Again, Thank you,

Marilyn


* I will continue to strive; to push my mind, and imagination as I hope it sparks your creativity and artistic voice!


A tile I made from the tutorials stack


Sunday, June 7, 2015

The Tutorial - Part 2 Mokume Gane, Alcohols Inks and Translucent Polymer Clay

I hope you enjoyed the Intermission!  Okay, we are actually reaching the home stretch, if you have stayed with me thus far . . . thank you! Now, onto Part 2.


6.  Remember the B/W sheets we put together and set aside? Now we are going to work that sheet we created.  Put it through the pasta machine on the thickest setting which should reduced it to a thickness of 1/8 inch (manually it should end up approximately that thickness). It will almost be doubled in length.


7.  Place that sheet we just created, lay on top of your dried alcohol inked transparent sheet of polymer clay. Then, put that through the pasta machine on the thickest setting whereas, this is  the "compression" in metalsmith terminology of what we are actually doing to the polymer clay.


8.  Once again, your sheet will almost double in size.  After which, you can trim the sheet up, cut in half and stack it, making sure your black is always on top. *see image 9.


9.  This is where you can get out all your cutters, old credit cards, needle nose pliers and create your unique stamp on your polymer clay stack. *use the blunt side of cutters to better drag the colors throughout the stack, same for anything you are going to be using for design purposes.


10.  You can, before you begin slicing, lightly use your acrylic roller (any) to compress the stack a bit and that in turn helps hold it to the table.  You can also elevate your stack by placing it on scrappy clay as to not dug quite so deep unevenly through the stack . . .there is a video showing exactly how to do this, I'll have find it.  Using a sharp tissue blade taking the thinnest slices possible underneath the top sheet, begin slicing through your stack as I have pictured below. Turn your cut slices over to reveal the patterns and colors.


11.  Here are my slices from my stack, yours may be very different from mine and that's a good thing.  But, the fun isn't over quite yet.  We now have to use these slices in creating a piece, the magic begins in the baking of the translucent polymer clay with the alcohol inks and don't forget our leafing sheet!


** to be continued in The Tutorial - Part 3 Mokume Gane, Alcohol Inks and Translucent Polymer Clay  . . . Thanks!

The Tutorial - Part 1 Mokume Gane, Alcohol Inks and Translucent Polymer Clay

1.  Condition a sheet of Black on the thickest setting if, you are using a pasta machine and a sheet of White Polymer clay again, thickest setting. *if using a roller - approx. 1/8 inch.


2.  Create a stack with the Black on top of the White, set aside.


3.  Now, condition a sheet of Translucent polymer clay on the thickest setting or roll again, to 1/8 inch.  (I personally, condition my translucent 20+ times until I can smell the plasticizers releasing from within the clay itself then, I know the chemicals in the clay are properly mixed).

4.   Okay, now carefully, because you know how these leafing sheets can get away from you! And, lay a sheet (gold or silver) I am using silver here.  gain carefully lay it on top of the translucent sheet of polymer clay.  Here I have just used my acrylic roller to "crackle" the sheet.


Now grab your alcohol inks!  These are a few of Tim Holtz's - Adirondack Ink (don't forget to use your craft store coupons!!!).


5.  This is where your creative imagination comes in!  Randomly or not, your choice apply drops of ink (I didn't have to squeeze the bottle to obtain a drop on my sheet) you can use as many or as little color as you want.  Here I have used Blue, Poppyfield and Teraa Cotta in a random pattern.  When you like the colored pattern you have . . . STOP!  Now, you must let these inks dry that usually takes an hour or more.  I don't use my heat gun to speed up this process because it degrades the intensity of the inks I have found in other projects with the use of alcohol inks.


- INTERMISSION -


The Tutorial - Introduction: Material's List Mokume Gane, Alcohol Inks and translucent Polymer Clay Technique


My Bracelet created from the Mokume Gane slices from this tutorial


Why am I doing this!?  Because there are a few people, and you know who you are that want to know how I am achieving these latest created pieces using translucent polymer clay and alcohol inks so, I am sharing my knowledge gained laboring diligently in my crafty LA-BOR-A-TORY! Just for fun, say that like Dr. Frankenstein after watching his monster high above the castle being electromagnetically shocked and then coming back down, down into the lab and twitching . . . and the doctor saying that famous line, It's Alive!!!!!

Okay, on with the tutorial!
** just a side note - if you have any questions and/or something you aren't understanding, do not hesitate to leave me a comment at the bottom *remember there are no stupid questions as there may be others sitting there at any point in time wondering the same thing but, afraid to ask!

In this tutorial I am assuming, you all have a basic knowledge and understanding of skills in beginning polymer clay.  With that said, Let's Begin!

What you will need:
Polymer clay:  I have used 3/4 of a 2oz bar of each
                         White
                          Black
                          Translucent
** this can be your choice depending on how much you want to create to be used for your future projects: necklaces, earrings, pendants, also used as an overlay on objects.  Also, use the clay you feel you get the best results from,  I use Sculpey Translucent.  I have used other brands; Kato, Fimo and Premo and I went back to Sculpey because I achieved the best transparency with it but, you use what you feel most comfortable.

Additional Materials and Tools used:
                           Pasta Machine (not a necessity)
                           Acrylic Roller ( or whatever you use for rolling)
                            Sharp Blade and/or Flexible Blade
                            Gold or Silver Leaf Sheets (1 sheet needed)
                            Cookie Cutters and/or objects to create a design
or effect in the clay (specifically for polymer clay)
                            Acohol Inks (any colors - Tim Holtz, Ranger, etc.)
** if you use regular cookie cutters or any objects to create your patterns in the clay DO NOT USE them  again for servicing or eating off of, in association with food or food preparation there afterwards.  They will remain dedicated polymer clay tools for use only!!!


                                               On to Part 1 of The Tutorial

Polymer Clay - Mokume Gane with Translucent Clay and Alcohol Inks

I have been experimenting specifically in the adapted technique called,  Mokume Gane. With this technique, the experiment has been in incorporating the use of translucent polymer clay, gold and silver leafing sheets, and alcohol inks. Below are some examples of my created pieces from these experiments.